
通过frp stcp实现windows远程连接
开始使用
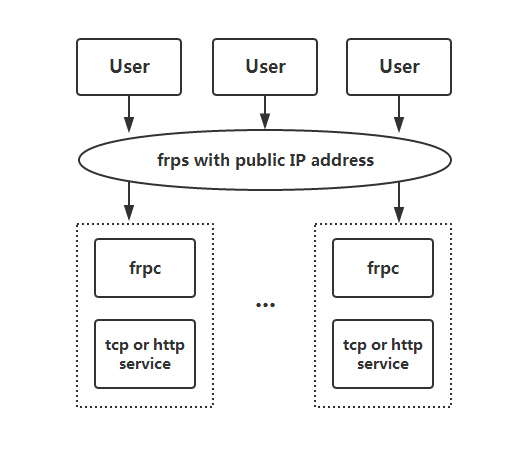
为何要用 frp
国内特殊的互联网环境导致个人的家庭宽带很难获得外网ip,导致无法在外网访问自家的内网。通过使用一台具有外网ip的主机进行frp内网穿透,可以方便的在外网访问内网,不过对于远程桌面这种信息敏感的应用场景,需要更安全的配置方法。
frp带给我们stcp的方法来更安全地突破内网限制。
以下是官方给的原理图
下载地址

基本使用方法(Windows 远程桌面)
单独使用这种最基本的连接方式不够安全,通常情况下建议只用于入门和测试设备之间是否能连通
服务端
以当前版本 0.35.1 为例,在linux下配置服务端:
// 下载
$ wget https://github.com/fatedier/frp/releases/download/v0.35.1/frp_0.35.1_linux_amd64.tar.gz
// 解压
$ tar -zxvf frp_0.35.1_linux_amd64.tar.gz
// 进入文件目录
$ cd frp_0.35.1_linux_amd64
// 编辑服务端配置文件
$ vi frps.ini
//frps.ini

[common]
bind_port = 7000
// 启动服务端
$ ./frps -c ./frps.ini
客户端
Windows / Mac 下载解压即可
win: https://github.com/fatedier/frp/releases/download/v0.35.1/frp_0.35.1_windows_amd64.zipwin+r 打开cmd,在文件目录下执行start frpc.exe即可启动,文章底部有更好的办法
mac: https://github.com/fatedier/frp/releases/download/v0.35.1/frp_0.35.1_darwin_amd64.tar.gz
进入“终端”,在目录下输入指令./frpc -c ./frpc.ini
// frpc.ini

[common]
server_addr = x.x.x.x
server_port = 7000

[ssh]
type = tcp
local_ip = 127.0.0.1
local_port = 3389
remote_port = 3389
设置“允许远程连接到此计算机”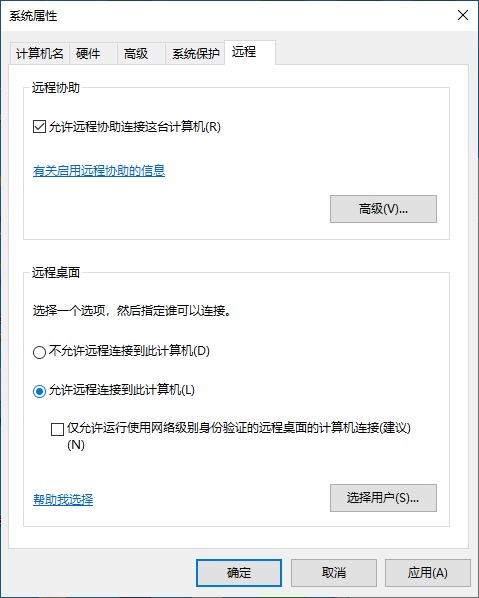
通过这些设置之后,你电脑的3389端口会暴露到外网,在任何有网的地方访问x.x.x.x即可连接
生产环境用法
stcp
这是一种更安全的连接方法,相当于连接远程的一方要念对暗号才能打开大门,在此之前,端口不会暴露在互联网上,增加了安全性
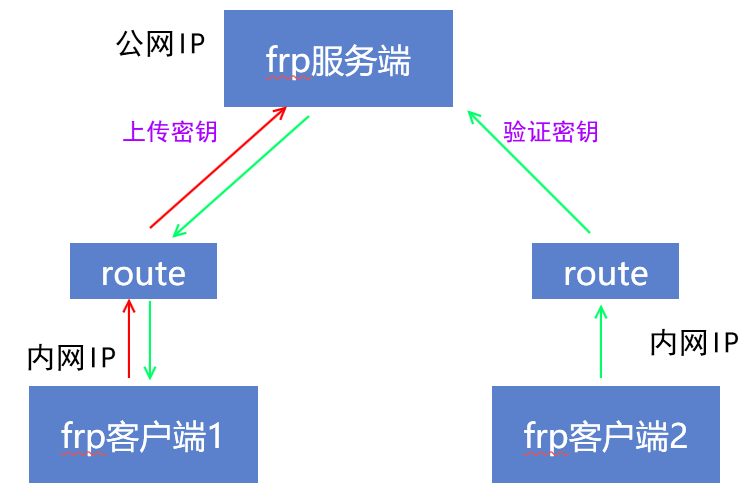
*图片来自网络
服务端
在有外网ip的机器上,
# frps.ini

[common]
bind_port = 7000
// token 鉴权
authentication_method = token
token = token
// 只允许 tls 连接
tls_only = true

// 网页状态面板
dashboard_port = 8888
dashboard_user = admin
dashboard_pwd = admin
通过 ./frps -c ./frps.ini 启动服务端
客户端 1
在需要通过外网访问的机器上
# frpc.ini

[common]
server_addr = x.x.x.x
server_port = 7000
authentication_method = token
token = token
tls_enable = true

[frp_visitor]
type = stcp
# stcp 的访问者
role = visitor
# 要访问的 stcp 代理的名字
server_name = frp
# 只有 sk 一致的用户才能访问到此服务
sk = token
# 绑定本地端口用于访问 远程桌面 服务
bind_addr = 127.0.0.1
bind_port = 6000
# true 启用加密
use_encryption = false
# true 启用压缩
use_compression = false
通过 ./frpc -c ./frpc.ini 启动客户端
客户端 2
在需要连接远程的机器上
# frpc.ini

[common]
server_addr = x.x.x.x
server_port = 7000
authentication_method = token
token = token
tls_enable = true

[frp]
type = stcp
sk = token
local_ip = 127.0.0.1
local_port = 3389
# true 启用加密
use_encryption = false
# true 启用压缩
use_compression = false
通过 ./frpc -c ./frpc.ini 启动客户端
xtcp
这是一种基于stcp上的p2p(点对点)的连接方法,理论上延迟更低。但是目前功能开发不够完善,还不太稳定,建议还是首选stcp。
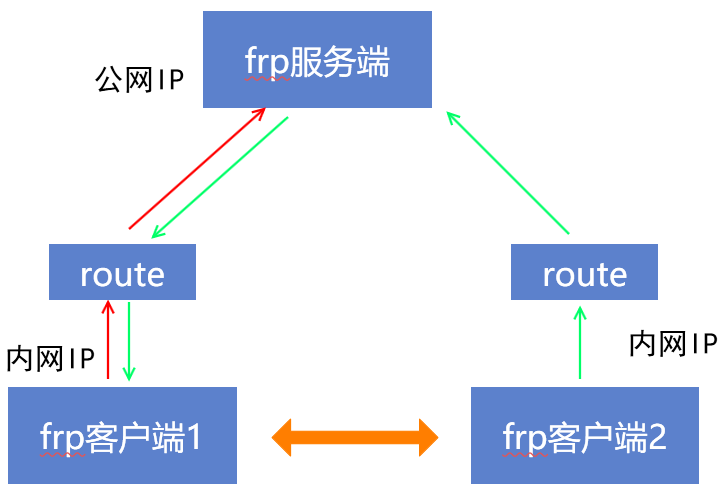
*图片来自网络
把 frpc.ini 中的 type = stcp 改成 xtcp即可
服务端
不变
客户端 1
在需要通过外网访问的机器上
# frpc.ini

[common]
server_addr = x.x.x.x
server_port = 7000
authentication_method = token
token = token
tls_enable = true

[frp_visitor]
type = xtcp
# stcp 的访问者
role = visitor
# 要访问的 stcp 代理的名字
server_name = frp
# 只有 sk 一致的用户才能访问到此服务
sk = token
# 绑定本地端口用于访问 远程桌面 服务
bind_addr = 127.0.0.1
bind_port = 6000
# true 启用加密
use_encryption = false
# true 启用压缩
use_compression = false
通过 ./frpc -c ./frpc.ini 启动客户端
客户端 2
在需要连接远程的机器上
# frpc.ini

[common]
server_addr = x.x.x.x
server_port = 7000
authentication_method = token
token = token
tls_enable = true

[frp]
type = xtcp
sk = token
local_ip = 127.0.0.1
local_port = 3389
# true 启用加密
use_encryption = false
# true 启用压缩
use_compression = false
通过 ./frpc -c ./frpc.ini 启动客户端
建立本地 http 服务器
官方示例

服务端
# frps.ini

[common]
bind_port = 7000
// token 鉴权
authentication_method = token
token = token
// 只允许 tls 连接
tls_only = true

//
vhost_http_port = 8080

// 网页状态面板
dashboard_port = 8888
dashboard_user = admin
dashboard_pwd = admin
客户端
[common]
server_addr = x.x.x.x
server_port = 7000
token = token
tls_enable = true

[web]
type = http
local_port = #port
custom_domains = #domains
更优雅的使用方式
网上其他教程都简单粗暴的地直接运行命令启动frp,但显然不够优雅,基于这个原因我研究了两种更优雅的使用方式
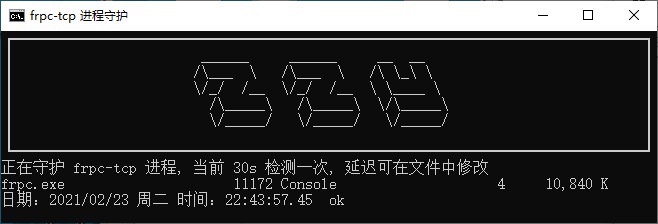
进程守护脚本
这个东西一旦不小心关闭,远程就无法进行下去。
所以做了一个守护脚本,30s自动检测进程是否存在,一定程度上避免了因为意外关闭导致的麻烦
@ECHO OFF
setlocal enabledelayedexpansion


rem 设置进程检测延迟, 单位 (秒)
set /a check_delay = 30


mode 82,12
set "d=%~p0"
set "d=%d:\= %"
for %%a in (%d%) do set name=%%a
set /a var=0
start frpc.exe
:loop
set /a var=%1+1
set /a var2=%var%-1
if %var2%==0 (set num= ) else (set num= 已重启 !var2! 次 restart_service.txt中具有详细信息)
title %name% 进程守护%num%
echo ┏━━━━━━━━━━━━━━━━━━━━━━━━━━━━━━━━━━━━━━━━━━━━━━━━━━━━━━━━━━━━━━━━━━━━━━━━━━━━━━━┓
echo ┃             ______     ______     __  __               ┃
echo ┃            /\___  \   /\___  \   /\ \_\ \              ┃
echo ┃            \/_/  /__  \/_/  /__  \ \____ \              ┃
echo ┃              /\_____\   /\_____\  \/\_____\             ┃
echo ┃              \/_____/   \/_____/   \/_____/             ┃
echo ┃                                        ┃
echo ┗━━━━━━━━━━━━━━━━━━━━━━━━━━━━━━━━━━━━━━━━━━━━━━━━━━━━━━━━━━━━━━━━━━━━━━━━━━━━━━━┛
echo 正在守护 %name% 进程, 当前 %check_delay%s 检测一次, 延迟可在文件中修改
tasklist|find /i "frpc.exe"
if %errorlevel%==0 (
goto true
) else (
goto false
)
goto :loop

:true
echo 日期:%DATE% 时间:%time%  ok
ping -n %check_delay% -w 500 127.1>nul
cls
goto loop

:false
start frpc.exe
echo 未检测到进程
echo 启动 %name% ...
echo 程序重新启动于 日期:%DATE% 时间:%time% >> restart_service.txt
ping -n 5 -w 500 127.1>nul
cls
call :loop %var%
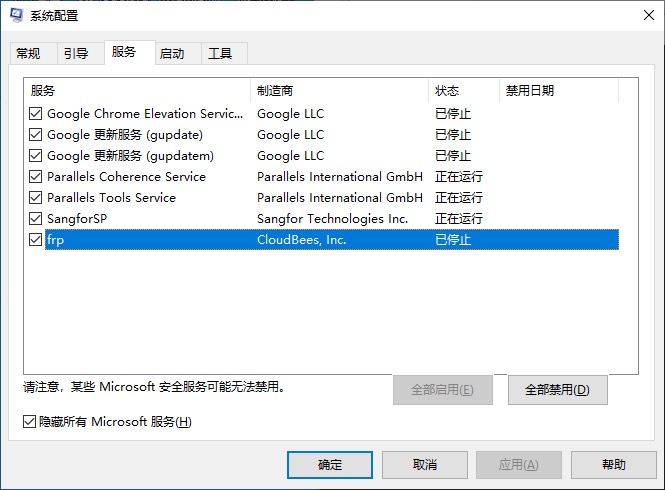
通过 Windows 服务的方式运行 (推荐)
优势
这种方法无运行窗口,开机以服务方式启动。放在启动项的方式,则需要登录之后才能运行
我下载的版本: https://github.com/winsw/winsw/releases/download/v2.10.2/WinSW.NET4.exe
下载之后,把文件放在frp目录下,新建一个‘文件名’+.xml的文件,比如WinSW.NET4.xml,并写上以下内容
// WinSW.NET4.xml

<service>
<id>frp</id>
<name>frp</name>
<description>Frp Client</description>
<executable>frpc</executable>
<arguments>-c frpc.ini</arguments>
<logmode>reset</logmode>
</service>
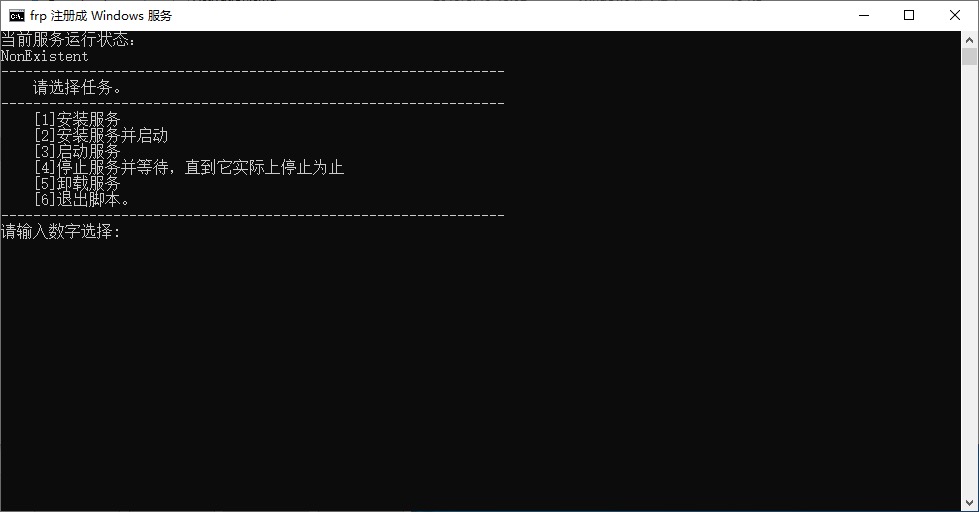
便捷管理
新建一个cmd,复制以下内容,就能便捷管理了
// 安装服务.cmd

    @ECHO OFF
    :home
    title frp 注册成 Windows 服务
    cls
    echo 当前服务运行状态:
    WinSW.NET4.exe status
    echo ---------------------------------------------------------------
    echo     请选择任务。
    echo ---------------------------------------------------------------
    echo     [1]安装服务
    echo     [2]安装服务并启动
    echo     [3]启动服务
    echo     [4]停止服务并等待,直到它实际上停止为止
    echo     [5]卸载服务
    echo     [6]退出脚本。
    echo ---------------------------------------------------------------

    choice /n /c 12345678 /m "请输入数字选择:"
    cls
    if errorlevel 6 exit
    if errorlevel 5 goto uninstall
    if errorlevel 4 goto stopwait
    if errorlevel 3 goto start
    if errorlevel 2 goto installandstart
    if errorlevel 1 goto install

    :install
    WinSW.NET4.exe install
    goto choice

    :installandstart
    WinSW.NET4.exe install
    WinSW.NET4.exe start
    goto choice

    :start
    WinSW.NET4.exe start
    goto choice

    :stopwait
    WinSW.NET4.exe stopwait
    goto choice

    :uninstall
    WinSW.NET4.exe stop
    WinSW.NET4.exe uninstall
    goto choice

    :choice
    echo ---------------------------------------------------------------
    echo     [1]返回
    echo     [2]退出脚本
    echo ---------------------------------------------------------------
    choice /n /c 12 /m "请输入数字选择:"
    cls
    if errorlevel 2 exit
    if errorlevel 1 goto home